QR & Barcode Scanner + Generator is a simple yet powerful mobile app that lets you both scan various codes and create your own. This guide will walk you through using the app step by step. The app stands out because it’s fast, privacy-friendly, and completely ad-free – it doesn’t collect your data and works even without an internet connection. Whether you’re new to QR codes or an experienced user, this friendly tutorial will help you get the most out of the app.
Scanning QR Codes and Barcodes
One of the primary features of the app is quickly scanning QR codes or barcodes to get information. You can scan codes using your device’s camera in real time, or even scan codes from images saved on your phone. The app’s interface is clean and easy to understand, so don’t worry if you’re not tech-savvy. Let’s go through both methods:
Scanning with Your Camera (Live Scan)
Scanning a code with the live camera is straightforward. Just follow these steps:
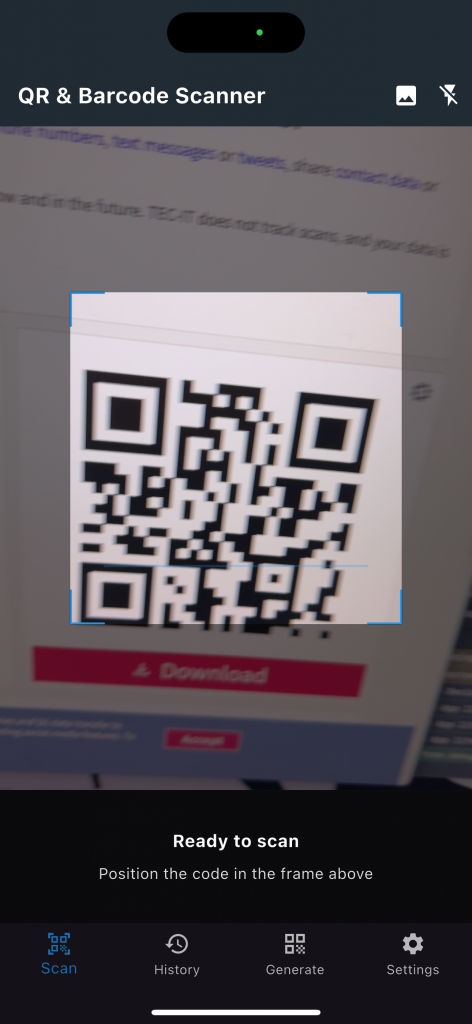
- Open the app – It will immediately open to the Scan screen and activate your camera. (If it’s your first time, you might need to allow camera permission when prompted.)
- Point your camera at a QR code or barcode – No need to press any shutter button. Simply position the code inside the frame on the screen. A message like “Ready to scan – Position the code in the frame” will be displayed to guide you.
- Wait for the app to recognize the code – The scanner is fast and automatic. As soon as the code is in focus and well-lit, the app will detect it. You’ll typically feel a quick vibration or hear a beep (depending on your device settings) to indicate a successful scan.
- View the result – Once scanned, the app will show you the content of the QR code or barcode. For example, if it’s a URL, you’ll see the web address; if it’s contact info, you’ll see the details, etc.
- Take action – With the result on screen, you can decide what to do next. You might see options like “Open in browser” for web links, “Call” for phone numbers, or “Copy” to copy text. If the code contained plain text, the text will be shown and you can simply read or copy it. Tip: If you’re scanning in a dark environment, tap the flashlight icon (usually in the top corner of the scan screen) to turn on your camera’s flash for better visibility. This will help the camera read the code more easily.
That’s it! You don’t have to press any capture button — the app scans automatically as soon as the code is visible and in focus.
Scanning a Code from an Image (Gallery)
What if you have a QR code or barcode saved as an image or in a screenshot? The app lets you scan those too. Here’s how:
- Tap the Gallery/Image icon – On the Scan screen, look for an icon that looks like a picture or gallery (often at the top right). Tap this icon to open your phone’s image picker.
- Choose the image – Browse your photos and select the image that contains the QR code or barcode you want to scan. For example, you might have a QR code in your photo library or a screenshot of a ticket or menu.
- Let the app scan the image – Once you select the image, the app will process it and look for any QR code or barcode in the picture. This happens quickly. You don’t need to crop or edit the image; the app will find the code automatically if it’s clear.
- View the result – Just like with the live camera scan, the app will display the content decoded from the image. You’ll see what information was embedded in that QR code/barcode and can then choose an action (open it, copy it, etc.).
Using the gallery scan is very handy for codes you receive via messaging apps or social media, or if someone sends you a barcode to scan. You can scan it without needing a second device — just use the saved image. (Screenshot suggestion: Show a screenshot of the app after selecting an image from the gallery with a code, demonstrating the result display.)
Using the Auto-Action Feature
The Auto-Action feature is a convenient option that makes scanning even faster. When enabled, the app will automatically perform the appropriate action as soon as a QR code is scanned, without asking for confirmation. For example, if a QR code contains a web link, it will immediately open the website in your browser; if it contains a phone number, it will open your dialer to call; if it’s contact info, it will prompt to save the contact; and so on. This can save you an extra tap, especially if you trust the codes you’re scanning.
By default, Auto-Action is turned off (so that you can review the content first). You can easily turn it on or off in the settings:
- Open Settings – Tap the Settings tab (the gear icon at the bottom of the app).
- Find “Auto-Action for QR Codes” – Scroll to the section labeled Scanner. You will see a toggle switch for Auto-Action for QR Codes. It has a description like “Automatically act on scanned QR codes without confirmation (URLs will open, contacts will be saved, etc.).”
- Toggle it on or off – Tap the switch to enable Auto-Action (or disable it if it’s already on). When the switch is on, it usually highlights or changes color to indicate it’s active. (Screenshot suggestion: Include a screenshot of the Settings screen highlighting the Auto-Action toggle in the Scanner section.)
Now, with Auto-Action enabled, try scanning a code to see the difference. For instance, scanning a URL QR code will immediately launch your web browser to that page. If you prefer to manually choose what to do with scanned content, simply leave this feature off. You can change this setting any time for your comfort.
Generating Your Own QR Codes and Barcodes
Another major feature of the app is the ability to generate (create) your own QR codes or barcodes. This is great when you want to share information with others in a quick, scannable form. You can create codes for plain text, links, your contact details, Wi-Fi network credentials, and more. The app supports many formats – from the popular square QR codes to the traditional line barcodes you see on products. Here’s how to create a code step by step:
- Go to the Generate screen – Tap the Generate tab on the bottom navigation bar of the app. You’ll see a screen titled “Generate QR / Barcode.”
- Choose the code format – First, decide if you want a QR code (or another 2D code) or a traditional barcode (1D linear code). Tap the “Code Type” dropdown menu. You’ll see options categorized by type. For example:
- 2D Codes: QR Code, Data Matrix, PDF417, Aztec (these are square or 2D patterns).
- Linear Barcodes: Code-128, Code-39, EAN-13, UPC, ISBN, etc. (these are the one-dimensional bar lines).
- Select the content type – Next, choose what kind of information you want to encode in the code. Tap the second dropdown (often labeled with a T𝚝 icon or called Content Type). You can pick the category that matches your content:
- Text: for plain text or any generic message.
- URL (Website): for a web link/URL.
- Contact Info: to create a digital contact card (often in vCard format) that others can scan to save your details.
- Wi-Fi: to create a code that lets others join a Wi-Fi network (it will include network name, password, and security type).
- Email: for an email address or even a pre-filled email draft link.
- SMS: to encode a text message prompt to a phone number.
- Phone Number: a telephone number that will prompt the scanner’s phone to call.
- Enter the content information – You’ll see a field labeled Content (or multiple fields if the app opens a special form for that type). Go ahead and type in the information you want the code to contain. This could be a sentence, a URL link (e.g.
https://example.com), contact details, and so on. Be sure to fill it in correctly (e.g., double-check phone numbers or Wi-Fi passwords). If it’s a long piece of text or a detailed contact, you can paste it in as well. - (Optional) Customize the QR code’s look – If you are creating a QR code (not a traditional barcode), you have the option to style it a bit. There is a “QR Styling” toggle with a palette icon on the Generate screen. If you switch QR Styling on, you may be able to change the color or appearance of the QR code. For example, you might choose a different foreground color instead of black, or add a bit of styling to the code’s design. This step is optional – it’s there if you want your generated QR code to look unique or match your branding. (Screenshot suggestion: Show the generate screen with the styling options toggled on, illustrating color selection.)
- Tap “Generate” – Press the big Generate button (usually at the bottom of the screen). The app will create the code based on the information you provided. In an instant, you should see your newly generated code displayed on the screen. If you created a QR code, you’ll see the black-and-white square pattern; if you made a barcode, you’ll see the lines and the numbers below it.
- Save or share the code – Once you have the code on-screen, you can use it right away:
- Save Image: There’s an option to save the code as an image to your device (often a button or icon labeled “Save Image” or a download icon). Tap that to save the QR/barcode image to your gallery. This is useful if you want to print it later or keep it for reference.
- Share: You can also share the code directly. Tap the Share button (usually an icon that looks like three connected dots or a share arrow). This will open your phone’s share menu so you can send the code image via email, messaging apps, social media, or other methods. For example, you could text the QR code to a friend or attach it in an email.
- Once saved or shared, the code can be scanned by others to retrieve the info you encoded. For instance, if you generated a contact QR, someone else can scan it and save your contact easily.

(Screenshot suggestion: Include an example image of a generated QR code on the screen with the save and share buttons visible.)
That’s all there is to it! You have created your own code. The app will also automatically add your generated code to the History tab for future reference (more on that later), so you can always find it again without retyping the info.
Scanning Food Labels with Open Food Facts
A unique feature of QR & Barcode Scanner + Generator is its integration with Open Food Facts for scanning food product barcodes. Open Food Facts is an open database of food product information. This means when you scan the barcode on many grocery items, the app can show you detailed information about that product, such as ingredients and nutritional facts, right on your screen.
How to use the food scanner:
Simply scan the barcode on a food package the same way you would scan any other barcode (using the camera scan). Point your camera at the product’s UPC or EAN barcode (usually found near the packaging’s bottom or side). If the product is recognized in the Open Food Facts database, the app will display a special Food Product information screen with several tabs of details.
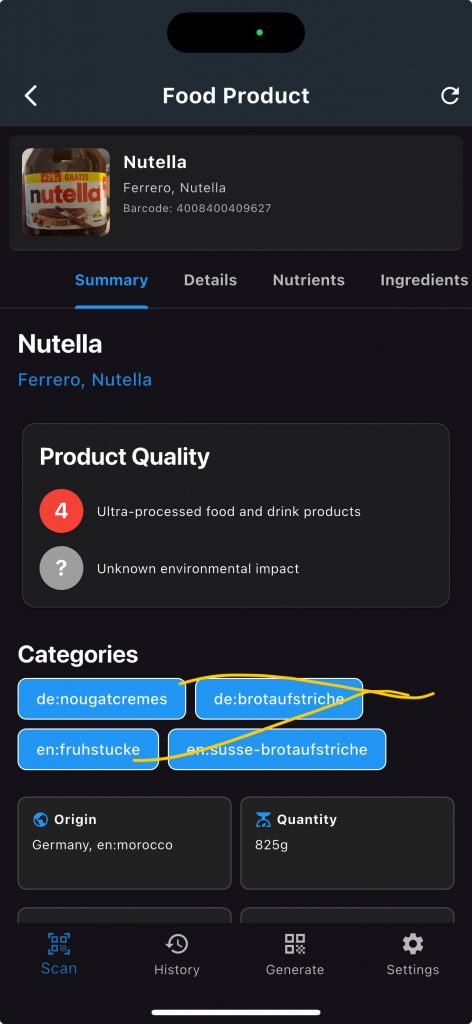
Here’s what you can expect to see on a food product result:
- Product Summary: At the top, you’ll see the product name, brand, and sometimes a photo of the item. For example, it might say “Pesto alla Genovese – Brand X” and show the barcode number. You might also see quick indicators like nutritional score or processing level (e.g., a rating of how processed the food is, or an eco-score grade for environmental impact).
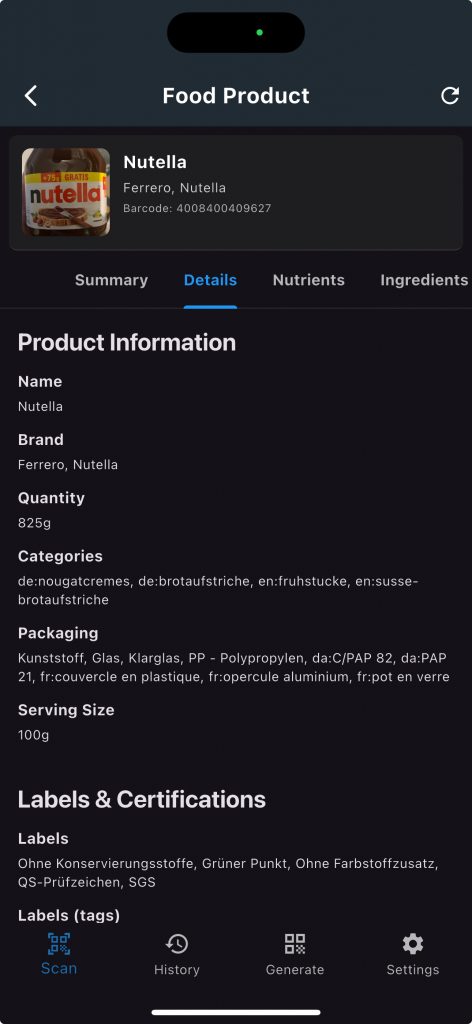
- Details: In one of the tabs or sections, detailed info such as the product’s categories (e.g., “Pasta Sauces” or “Condiments”), origin of the product (which countries it’s made in or popular in), and quantity/volume of the package are listed.
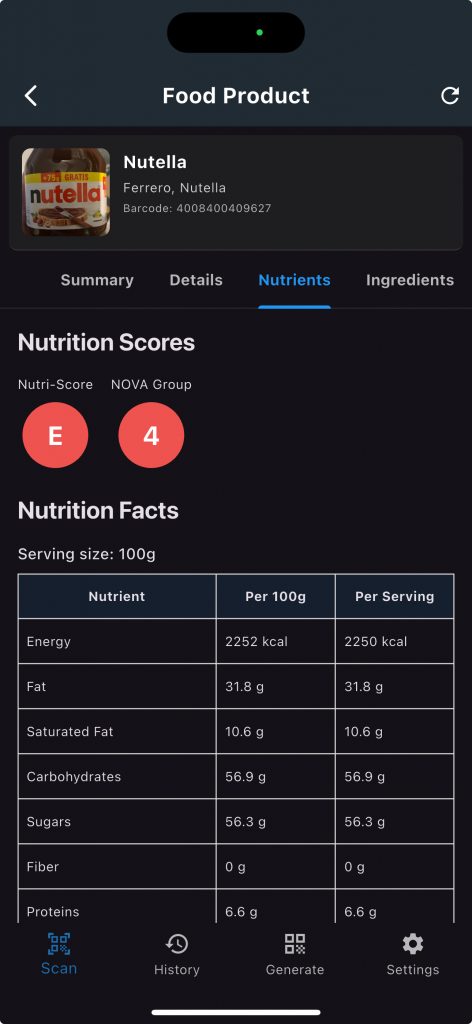
- Nutrients: There is usually a tab showing nutrition facts – things like calories, fat, sugar, salt per serving, etc., often accompanied by a Nutri-Score letter or similar indicator if available. This helps you quickly gauge how healthy the item is.
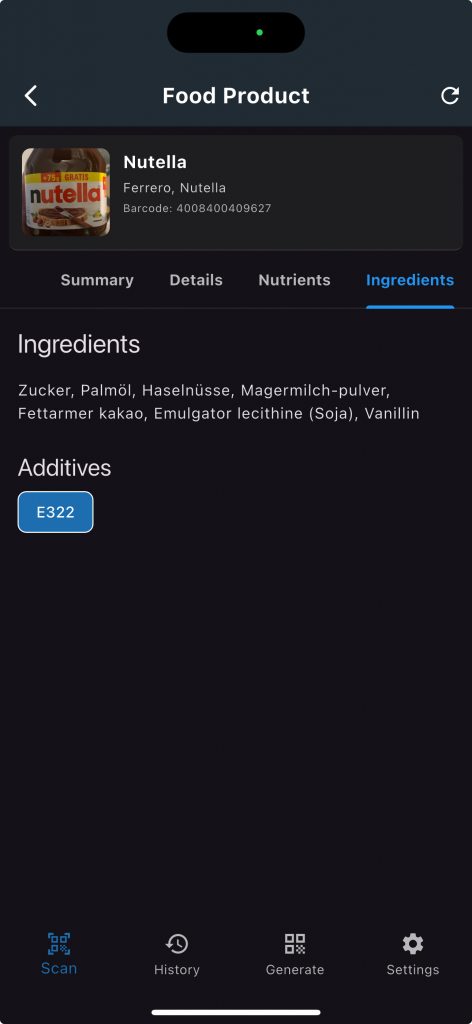
- Ingredients: Another tab will list the ingredients in the product and possibly highlight allergens (e.g., contains milk, contains nuts). This is very helpful if you have dietary restrictions or allergies.
- Environmental/Quality Scores: Some products show an Eco-Score (a grade from A to E on environmental impact) or a NOVA group (which tells how processed the food is). For instance, you might see something like “NOVA group 3 – Processed foods” or “Eco-Score D – High environmental impact” in the summary section.
You can navigate through these sections (usually by swiping left/right or tapping the tab headings like Summary, Details, Nutrients, Ingredients). The interface makes it easy to get a comprehensive view of the product.
If the product isn’t found in the database, don’t worry – the app will simply show the barcode number and you might get a message that it’s not available on Open Food Facts. You can always try again or scan another item. The database is large and constantly growing, so most common products will show up.
(Screenshot suggestion: Show the Food Product info screen with an example product, highlighting the tabs like Summary, Nutrients, Ingredients, etc.)
Note: To see the food product details, you’ll need an internet connection at least at the moment of scanning (since the app fetches the latest info from the online database). If you happen to be offline, the app will still decode the barcode number (so you’ll have the number in your History), and you can view the product info later when you’re online by tapping “View Product” in the History entry. There’s even a refresh button on the product info screen to update the data if needed.
This feature is great for quickly checking what’s in a product while you’re shopping or at home. It turns the app into a handy food scanner that promotes informed choices about what you eat!
Using the History Tab
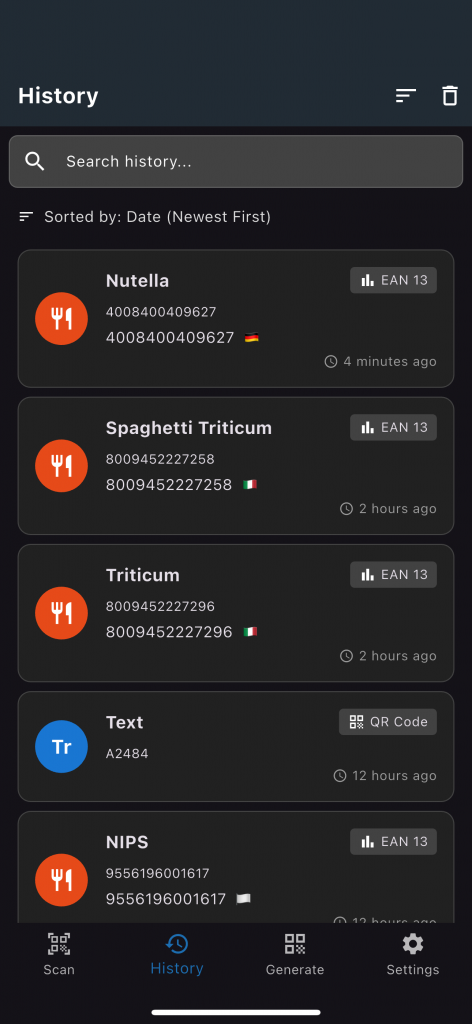
Every time you scan a code or generate a new one, the app keeps a log of it in the History tab. This is extremely useful for recalling information later without needing to scan the code again. For example, if you scanned a restaurant’s Wi-Fi QR code last week, you can find it in History instead of scanning it again. The history feature is like your archive of past scans and creations.
When you tap the History tab (the clock/recents icon on the bottom bar), you’ll see a list of entries with the most recent scans/generations at the top. Each entry might show an icon or small preview indicating what type of content it was (e.g., a little globe for a URL, a contact icon for a vCard, a fork-and-knife for a food product, etc.), along with a label or excerpt (like the name of a food product or the beginning of a text) and the date/time.
Here’s how to make the most of the History tab:
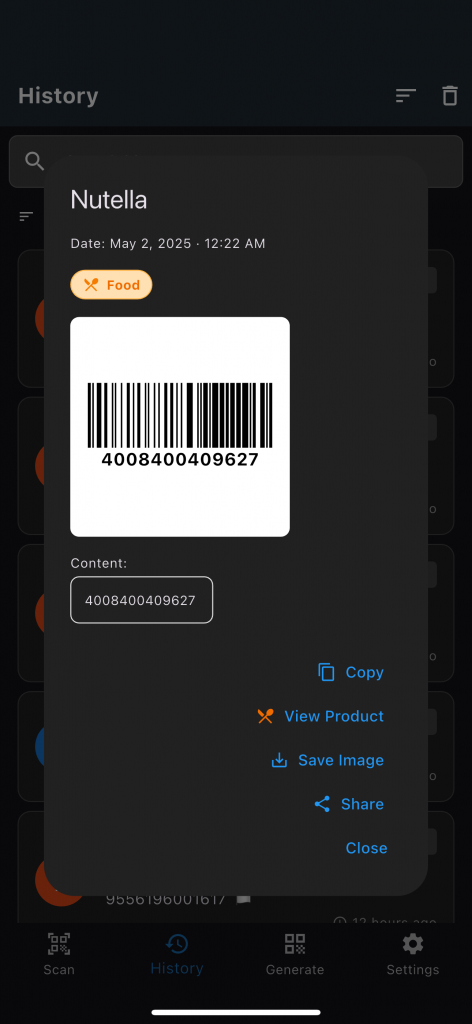
- View details of a past scan/code: Simply tap on any item in your history list. A detailed view will pop up, showing all the info about that entry. For example, if it was a QR code you generated, you’ll see the QR image and the content. If it was a scanned barcode of a product, you’ll see the number and maybe the product name. In this detail view, you’ll also get action buttons. Common options include Copy (to copy the content text to clipboard), Share (to share the content or image), and Save Image (to save the code image again). If the entry is a food product from Open Food Facts or a similar special type, you might see a “View Product” button – tapping that will bring up the full product info page again, just like when you first scanned it.
- Re-use information easily: History isn’t just a log; it lets you re-use what you scanned or made. For instance, if you have a QR code in history that contains a URL, tapping it can let you open that URL again without rescanning. If you generated a contact QR code last month and want to use it again, you can find it in History and quickly share the QR image from there. This saves you the trouble of recreating the same code or re-scanning something. Essentially, you can treat history as a library of QR codes and barcodes at your fingertips.
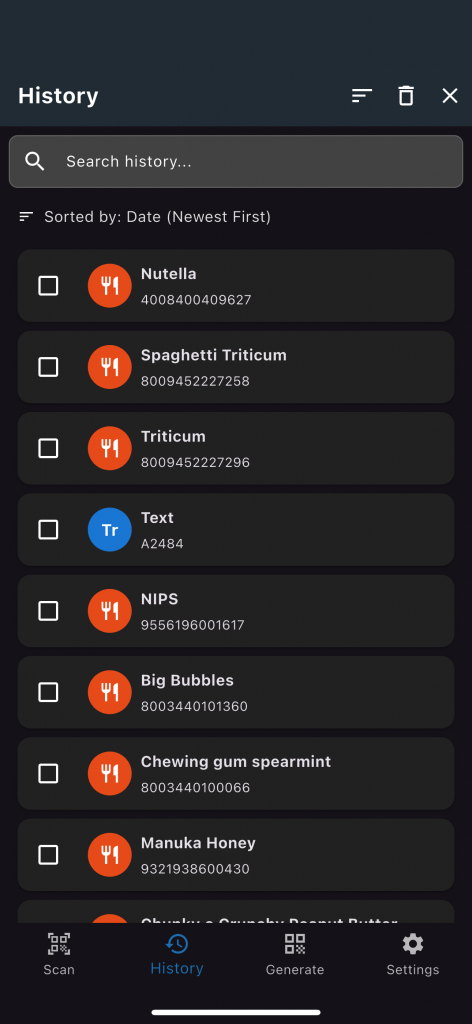
- Search or filter (if available): At the top of the History screen, you might notice a search bar or filter icon. If you have lots of entries, you can use the search function to type a keyword (like “Wi-Fi” or part of a text or product name) to find a specific entry. The filter option might let you narrow down by type (for example, show only QR codes, only barcodes, or only generated codes). This makes it easier to find things as your history grows.
- Delete past entries: You have full control over your history. To remove a single entry, you can usually swipe the item to reveal a delete option or tap a trash/bin icon on that entry’s detail view. To clear all history at once, look for a trash can icon usually at the top of the History screen. Tapping the clear-all icon may ask you to confirm, and then it will wipe the entire list. This is useful if you want to tidy up or if you’re privacy-conscious and don’t want to keep old records. Remember that deleting history entries will not affect the functionality of the app – it only removes the log; you can still use the app normally going forward.

The History feature makes the app a handy journal of all your scanned URLs, contacts, product barcodes, etc. You won’t have to scan the same thing twice, and you can retrieve info whenever you need it.
Customization and Accessibility
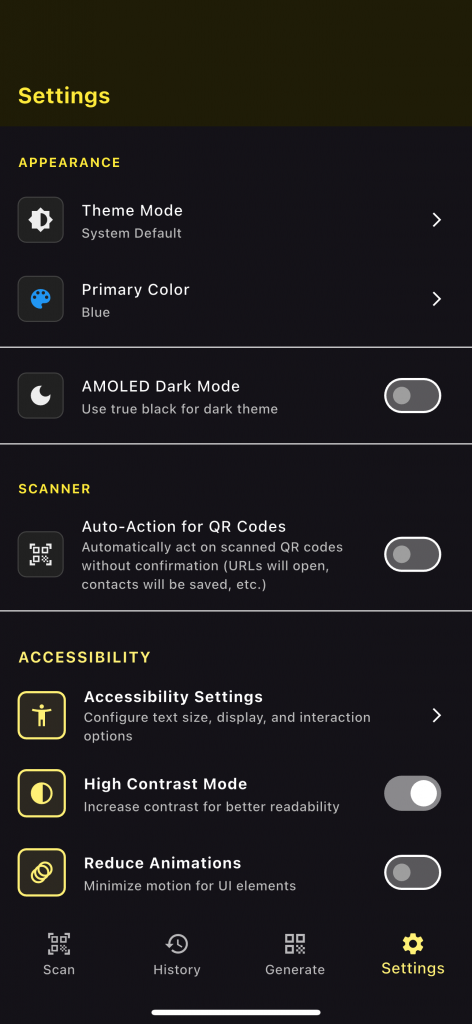
The app is designed to be usable by everyone, and it provides several customization and accessibility options to suit your preferences. All of these settings can be found under the Settings tab (bottom right gear icon). Here are some ways you can tailor the app’s look and feel, and improve usability:
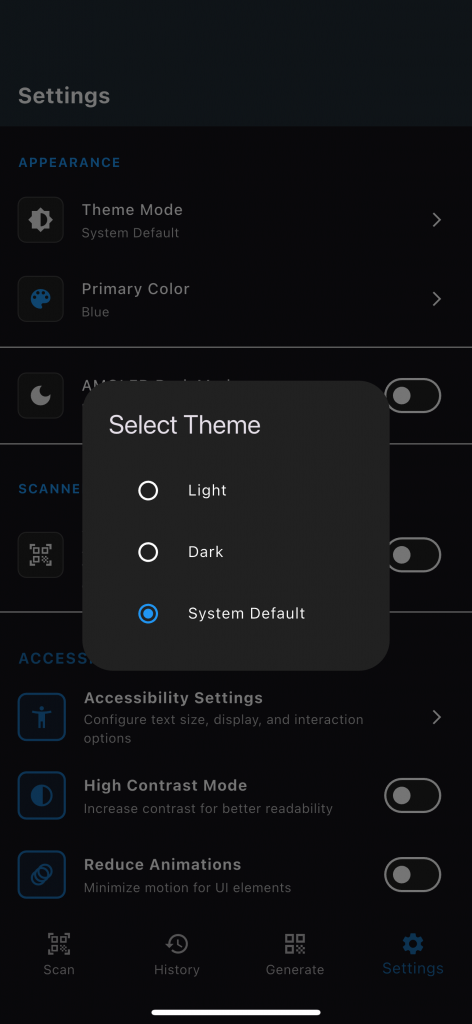
- Theme Mode (Light/Dark): You can switch the app between light mode, dark mode, or just set it to System Default to match your phone’s system theme automatically. If you prefer a dark background (which is easier on the eyes at night), you can set the app to always use Dark Mode. If you like a bright interface, choose Light Mode. By default, it likely follows your device’s setting.
- AMOLED Dark Mode: For those with phones that have AMOLED displays (common in many modern smartphones), there’s an option to use “true black” for the dark theme. Enabling AMOLED Dark Mode makes the background pure black, which can save battery on those screens and further reduce glare. This is an optional enhancement to the regular dark mode.
- Primary Color Customization: Maybe you have a favorite color or just want the app to feel more “you.” In settings, you can change the primary color of the app’s interface. This color is usually used for highlights, buttons, or icons in the app. For example, the default might be blue, but you could change it to green, purple, or another available color theme. It’s a fun way to personalize the app’s appearance.
- Accessibility Settings (Text Size & More): Under the Accessibility section in Settings, you’ll find a submenu for Accessibility Settings. Here, you can configure things like text size and other display/interaction options. If you have trouble reading small text, increase the font size for the app through these settings so that labels and results are easier to read. The app is designed to accommodate larger text without breaking the layout. There may also be options to adjust how buttons work or other assistance for those using screen readers.
- High Contrast Mode: Toggle on High Contrast Mode to make text and interface elements have higher contrast. This means text will appear bolder/whiter against dark backgrounds (or darker against light backgrounds), and UI elements will stand out more. It can greatly help visibility for users with low vision or in bright daylight conditions.
- Reduce Animations: If you are sensitive to motion or just prefer a snappier interface without visual effects, enable Reduce Animations. This will minimize or simplify the animations in the app (such as transitions between screens or scanning animations). The app will feel more instantaneous. This setting is also helpful for older devices to make the UI feel faster, and for accessibility to avoid any dizziness or discomfort some might have with too much motion.
All these options let you customize the app so it’s comfortable for you to use. For example, you might use Dark Mode and High Contrast together for night-time scanning with clear text, or use a larger text size with reduced animations for simplicity. Feel free to explore the Settings and tweak these to your liking – you can’t break anything by adjusting them, and you can always change them back.

No Ads, No Tracking – A Private Offline Experience
One of the best things about QR & Barcode Scanner + Generator is what it doesn’t include. This app is completely ad-free and has no tracking or analytics built in. You won’t be interrupted by pesky ads, and none of your scanning data or personal info is sent to any server. Everything the app does (scanning codes, generating codes, saving history) stays on your device. You can even use it fully offline whenever you want.
The only time you might use the internet is when taking advantage of online features like the Open Food Facts lookup (to fetch product details) or if you choose to follow a URL you scanned – and even then, it’s your choice and the app isn’t collecting data on those actions. There are no in-app purchases or “premium” unlocks either; you get all the features from the start, for free.
This focus on privacy and a clean user experience means you can use the app with peace of mind. It’s fast and lightweight because it’s not loading ads or unnecessary components, and it doesn’t ask for permissions it doesn’t need. You just get a straightforward, reliable tool that does exactly what it promises.
We hope this guide helps you feel comfortable using every feature of the QR & Barcode Scanner + Generator app. Now you’re ready to scan supermarket items, share your Wi-Fi with friends via QR code, save contacts seamlessly, and more – all with a few taps and without any hassle. Enjoy the convenience and privacy of this app, and happy scanning!